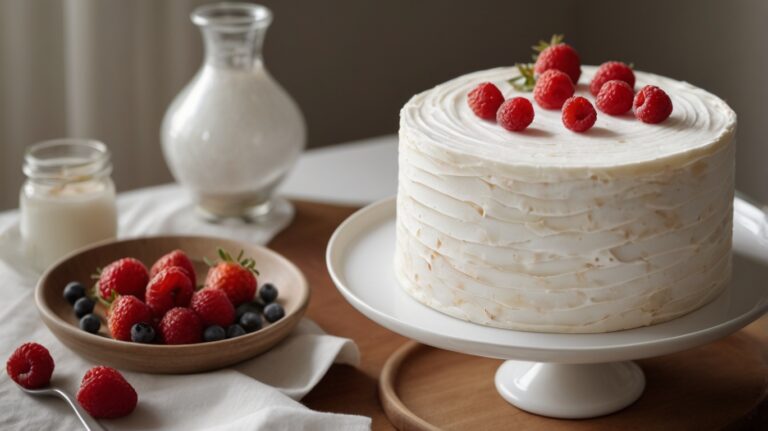
Have you ever looked at a cloud and thought, “I wish I could eat that?” Well, get ready, because this cloud cake recipe is about to make that dream come true! It’s so light and airy, you’ll feel like you’re biting into a sweet, fluffy cloud. Forget heavy, dense cakes, this is a game changer! This is your chance to whip up something truly magical. It’s unbelievably delicious, and surprisingly simple, even if you’re not a pro baker. So, let’s get this baking party started!
Honestly, I’ve always been a bit intimidated by baking, but this light and airy cake? It’s like it has a little magic of its own. It’s like a gentle whisper of sweetness, and it just floats in your mouth. I remember the first time I tried it – it was like a taste of the sky itself! And trust me, you are going to absolutely adore it, my friend. It’s seriously the fluffiest, most wonderful cake ever!
What exactly IS a Cloud Cake?
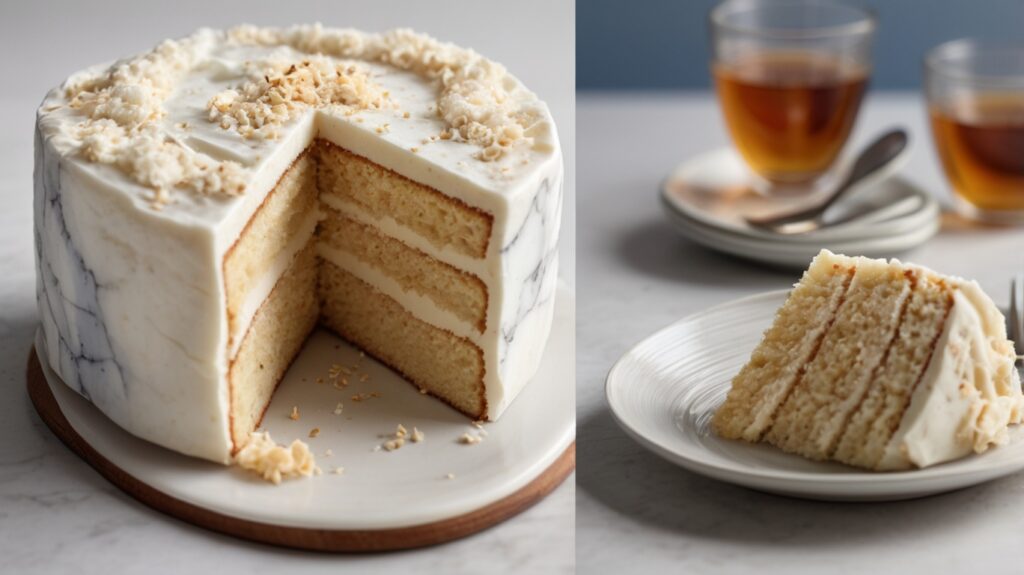
You may be wondering, what makes cloud cake so special? Well, picture a cake that is so incredibly light and airy, it almost feels like you’re biting into a cloud. Its texture is similar to a delicate soufflé and it has a unique melt-in-your-mouth feel. Some say it’s similar to Japanese cotton cheesecake, but it’s even lighter and more delicate. It is the ultimate experience for your tastebuds! This is not your regular cake.
It’s not like your regular sponge cake. This is so much more fun! Cloud cake is lighter, springier, and has a wonderfully soft consistency. When you bake it just right, it has a gentle wobble as it comes out of the oven! Isn’t that fun? It is so perfect for when you want a cake that’s just a little bit different. It makes any day feel like a celebration! Plus, it looks so impressive, but it’s actually much simpler to make than people think! This light and airy cake will impress your family and friends.
And you can also change things up, by adding different flavors or toppings. Sometimes, I love adding a little lemon zest, or maybe some almond extract. Other times, I will top it with fresh berries, or maybe a simple dusting of powdered sugar. It’s like having a blank canvas that you get to paint with yummy flavors! So, are you ready to dive into the nitty-gritty and learn how to make this cloud cake?
Grab Your Ingredients for this Cloud Cake Recipe
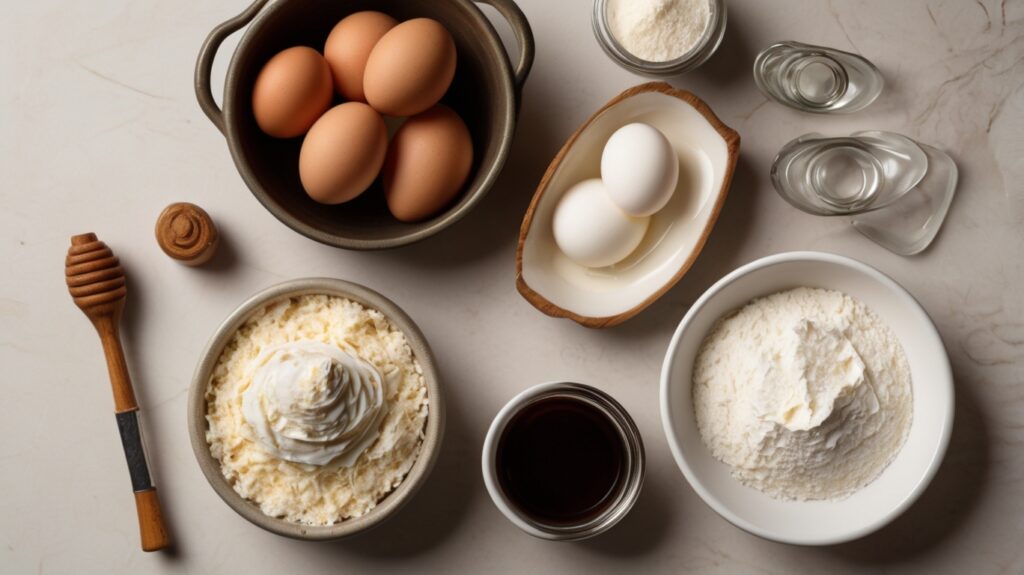
Let’s gather the ingredients, my friend, to create this amazing cake! It might look like a lot at first, but trust me, it’s not that complicated. You probably have most of this in your kitchen already! So, here is a list of the wonderful ingredients that will bring this cloud cake dream to life:
- Large Eggs – 6, separated. These are the foundation of the cake. Make sure to separate them carefully, as the whites will be our secret weapon for fluffiness. It’s also best if they are at room temperature, as they will whip up better.
- Granulated Sugar – 100 grams (about 1/2 cup). For just the right amount of sweetness. It may not seem like much, but it’s just the perfect amount to create a cake that is not too sweet.
- Cream of Tartar – 1/4 teaspoon. This little ingredient is a big deal! It helps those egg whites get super stiff, which is how we get our cake so cloud-like! It’s our magic dust.
- Cake Flour – 80 grams (about 3/4 cup). This will help the cake get that oh-so-soft texture, and make it melt in your mouth! Don’t skimp on this one.
- Whole Milk – 80 ml (about 1/3 cup). This adds moisture, and keeps things light and fluffy.
- Unsalted Butter – 50 grams (about 1/4 cup). Adds a lovely richness to the cake that makes it taste even better!
- Vanilla Extract – 1 teaspoon. Adds a nice hint of flavour, but you can also use other extracts like almond or lemon.
Make sure that you have all of your ingredients before we start this cloud cake recipe. That way, you won’t be running around looking for that one missing thing! Being organized makes baking so much easier and fun. And also make sure you double-check the quantities of each ingredient! You wouldn’t want to add a whole cup of sugar by mistake! That would be a sad disaster!
Let’s Bake: The Best Cloud Cake Recipe Step-by-Step
Okay, now it’s time to get down to business and bake this cute cloud cake! It may look difficult, but I promise you, it’s not as hard as it looks. If I can do it, you can too! So, let’s go step by step:
- Melt the butter: First, put the butter in a small saucepan over a low heat and let it melt completely, then set it aside to cool. Don’t put hot butter into the batter! It has to be lukewarm.
- Heat the milk: In another small saucepan, heat the milk until it’s just warm – not boiling. It’s like a little spa for our milk. Pour the warm milk into the melted butter and set that aside to cool too. We have the liquid ingredients all ready to go.
- Separate the eggs: Now, the tricky part! Carefully separate the egg yolks from the whites. Put the yolks in a big bowl and the whites in a separate one. Be careful to not get any yolk in with the whites, or they won’t whip up. Sometimes, I’m so clumsy, but with care, it’s easy.
- Mix the yolks: Add half the sugar to the egg yolks and whisk it until it becomes pale and thick. We want those yolks to be fluffy and happy. Don’t worry if you see some air bubbles.
- Add the milk mixture: Add the warm milk and butter mixture to the egg yolks. Mix until it’s nice and smooth. It looks so creamy and delicious, right?
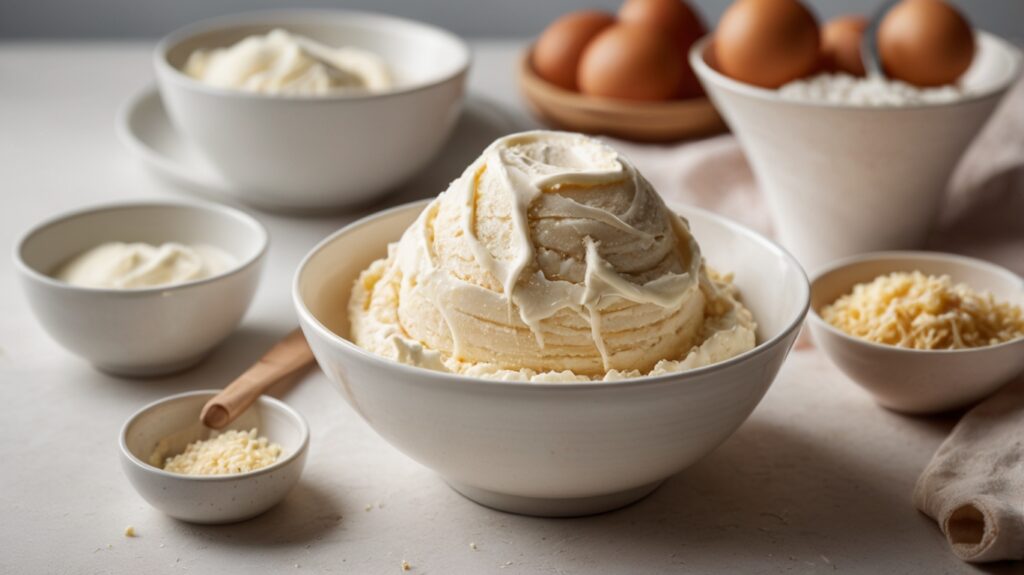
- Sift the dry ingredients: In a new bowl, sift together the cake flour and the other half of the sugar. Sifting makes sure there are no clumps. I think that sifting is actually kind of therapeutic!
- Combine everything: Gradually add the dry ingredients to the wet ingredients, and mix until just combined. Don’t over mix it, because that would make the cake tough. Gently tuck in the dry ingredients.
- Whip the egg whites: Now, to the egg whites, add the cream of tartar, and whip it with a mixer until it forms stiff peaks. This is where the magic happens! The egg whites make our light and airy cake so fluffy! They are ready when you turn the bowl upside down, and they don’t move.
- Fold it in: Gently fold the egg whites into the batter in two or three parts. Be gentle, we want to keep all the air! Remember, we are creating clouds, not pancakes!
- Bake it: Pour the batter into a lined baking pan (about 7 or 8 inches) and bake in a preheated oven at 320°F (160°C) for about 40-50 minutes.
- Cool down: When it’s baked, turn off the oven, crack the door slightly, and let the cake cool in the oven for 10 minutes. Then take it out and cool completely on a wire rack before removing from the pan.
Now, doesn’t that all sound so exciting? It may look like many steps, but I promise you, once you do it once or twice, it becomes second nature. And honestly, it is such fun! It’s like a little science experiment, but the result is a cake! What’s not to love?
My Little Tricks: Making the Perfect Cloud Cake
Okay, you have gone through the recipe, so now it’s time to talk secrets for making that cloud cake perfect! Baking is an art and a science, so there are some things you can do to improve the results. These tips will help you make a cloud cake that is wonderfully fluffy, light and delicious:
- Temperature is key: Room-temperature ingredients are not a suggestion, my friend, they are a must! Make sure your eggs and milk aren’t cold. Cold ingredients don’t mix as well, messing up the texture of the cake. So, take them out of the fridge ahead of time.
- Whip those egg whites well: When whipping the egg whites, really give it your all. You want them to be super stiff, like fluffy clouds. Use the cream of tartar, it makes a huge difference! Whip, whip, whip until the bowl can be upside down without anything moving!
- Gentle with the batter: When folding the egg whites into the batter, be as gentle as a butterfly! Do not overmix, and keep that air in there. Use a spatula, and fold, don’t stir! You’re tucking in the egg whites, not mixing soup!
- Use the correct pan: Make sure you are using the right size pan. A 7 or 8 inch pan is perfect. And line it with parchment paper. Removing the cake will be so much easier. It’s so sad to bake a perfect cake, only for it to stick to the pan. So don’t forget the paper!
- Baking time is an estimate: Depending on the oven, baking times can vary, so keep an eye on your cake. It should be golden brown and a toothpick should come out clean when you poke it. If you don’t trust your oven, buy an oven thermometer.
Baking is like a dance, sometimes you have to just feel it. Experiment, don’t be afraid to make mistakes. You learn from each one! Don’t worry if your first cake is not perfect. Mine wasn’t either! It took a few tries to get it right. The most important thing is that you had fun, and learned something new! With this cloud cake recipe, you’ll get better every time!
Mix it Up: Variations and Fun Ideas for Cloud Cake
Let’s talk about variations now, because who doesn’t love a bit of variety? While this cloud cake is delicious on its own, it’s always fun to mix it up! Here are some ways to add your own twist:
- Flavor it up: Sometimes, I add a little extra flavour. A teaspoon of vanilla extract is always great, but you can use lemon or orange zest. Or almond extract. There are so many options! Think about your favourite flavours and go from there.
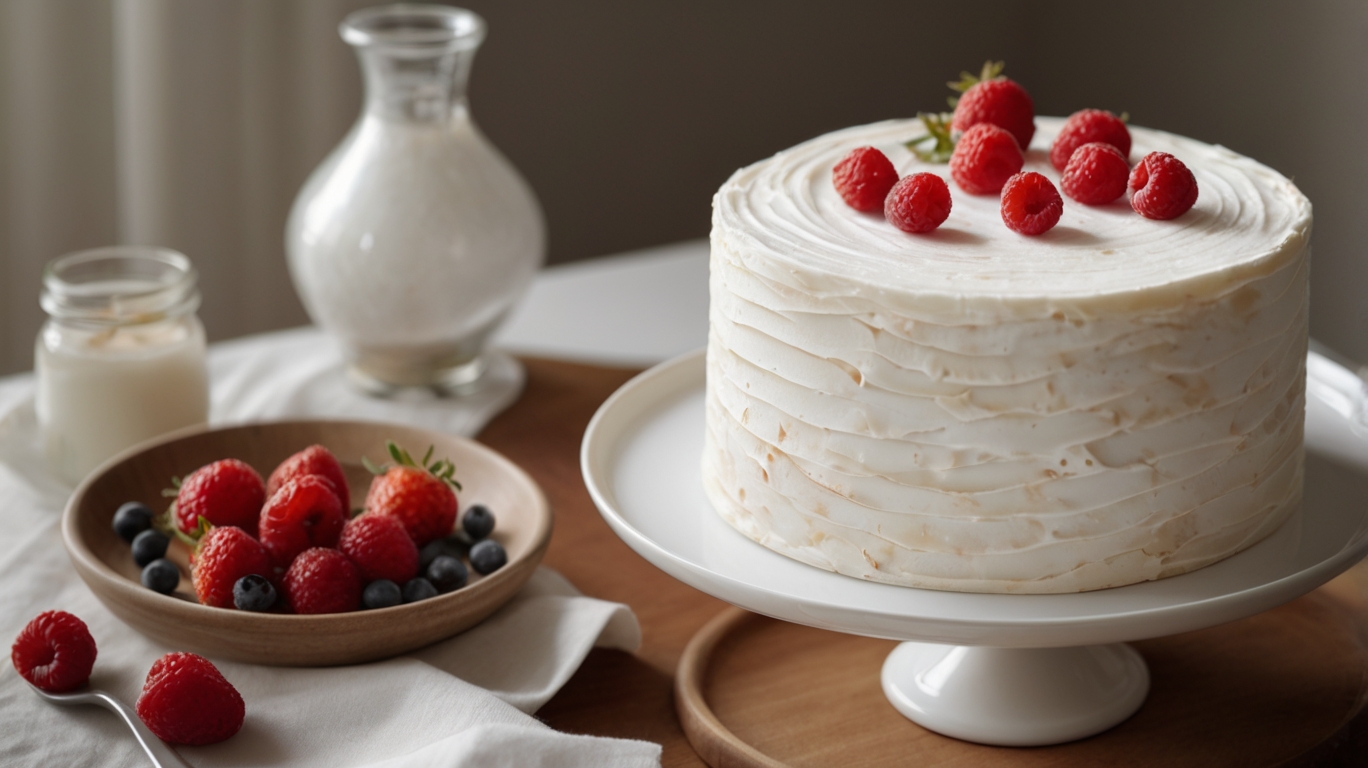
- Toppings: After it’s cooled, add some toppings, like powdered sugar, fresh berries, or whipped cream. Sometimes, I add chocolate shavings or caramel sauce. It’s like having a blank canvas to make your own masterpiece!
- Add-ins: You can add stuff to the batter like chocolate chips, nuts, dried fruit, or sprinkles! They’ll add some texture and flavor. Be gentle when folding them in, so you don’t deflate the egg whites!
- Seasonal versions: You can also make different versions, such as a pumpkin spice version for the fall or maybe a citrus version for the spring. If it’s Christmas, some cinnamon and nutmeg are always great. So many options!
- What would you try?: Seriously, what’s the first variation you would try? A chocolate version? A nutty one? Or do you like citrus? Maybe a bit of everything? Tell me in the comments, I am super curious!
Honestly, this light and airy cake is like a blank canvas and you can have so much fun creating different versions of it. So, don’t be afraid to experiment! Baking should be fun. Be creative, and have fun with it! It is your cake, so make it your own! You will love this cloud cake recipe.
Serving and Storage: Keep Your Cloud Cake Fresh
You have baked this cloud cake, and now you may be wondering about serving and storage. I have you covered! These tips will help you keep your cloud cake at its best:
- Serving Suggestions: When serving, add a dusting of powdered sugar or maybe a bit of whipped cream. Or some fresh berries. Or maybe ice cream. Whatever you feel like!
- Storage: If you don’t eat it all, store it in the fridge in an airtight container for up to 3 days. It might lose a bit of airiness over time, but it’s still yummy. Let it come to room temperature before serving, it will be softer.
- Freezing: The cake can be frozen. Wrap it tightly in plastic wrap and then in foil, and it will be fine for 2 months. Thaw it slowly, and best in the fridge overnight before you serve it.
So, whether you are sharing this with family or just eating a slice yourself, know how to make the most of it! It’s delicate, so handle with care! Take pictures of your creations. They are too pretty to not be shared! So, share your baking pics and let me know how it went. I am so excited to see what you create! You’ll become a pro at this cloud cake recipe in no time.
How do you make clouds for a cake?
You know, that’s a really great question! When you’re thinking about creating clouds for a cake, it isn’t as simple as taking a literal cloud! The “clouds” in a cloud cake comes from the magic of the egg whites. You see, when you whip the egg whites and incorporate them into your batter, it introduces a ton of air. That’s why the cream of tartar is so important, because it stabilizes the egg whites so that they hold their air! That’s how it gets that airy texture.
So when we’re asking “how do you make clouds for a cake?”, we are actually talking about making our cake super light and airy, and it all comes down to technique! This light and airy cake will be a showstopper!
How long do cloud cakes last?
Okay, so that’s another great question! And it’s important to know. If you’re planning on making this ahead of time, you’ll want to know how long it will keep for. A cloud cake, like most homemade cakes, tastes the best when eaten within a couple of days. But don’t worry! When you store it properly, in the fridge, in an airtight container, it will last for up to three days. And of course, you can also freeze it! When you do this, it can last up to 2 months! Just remember to let it thaw out properly, for best results. You can enjoy this cloud cake recipe for days.
Why is it called Robert Redford cake?
You know, I am so glad you asked this! It’s a super interesting question, and it actually has a pretty funny story behind it! While this recipe is for cloud cake, you might hear people call it Robert Redford cake! It’s said that this was a cake that was popular in the 70’s, and it was named after the famous actor. Apparently, it was so light and dreamy, people thought it was as dreamy as he was. Now that’s a cool story, right? So, even though we are baking a light and airy cake, you can say that it has the charm and allure of the one and only Robert Redford!
What is the secret to super moist cake?
You know, that’s a great question because no one likes a dry cake! When we are making cloud cake, it already tends to be super moist because of the milk content and the egg yolks. But there are also a few secrets to ensure that any cake is moist.
You need to use high quality ingredients, that are at the correct temperature. Also, you need to make sure you don’t overbake the cake! You should also add some kind of fat (in our case it’s the butter) which can help to keep things super moist. Also, adding enough liquid (which we have in our milk) is also important for the right balance. So, when you combine the right ingredients and the right technique, you’ll have a cake that’s moist, not dry! This cloud cake recipe is amazing.
Conclusion: Bake Your Cloud Cake Dreams!
Well, there you have it! We’ve reached the end of this baking adventure. You now have the secret to making your own wonderful cloud cake. It’s truly simpler than it seems, right? Keep those tips and tricks in mind, and you’ll be baking cloud cakes that everyone will be dreaming about. It’s the kind of cake you bake when you want to feel happy. It is a celebration of lightness and pure sweetness.
It’s not only about making a cake, it’s about creating little moments of joy. This cake has helped me create some special times, and I hope it does the same for you. So, be creative, have fun, and don’t be afraid of mistakes, they are part of the learning process. It’s the journey that matters, not just the final result, right?
So, are you ready to wow everyone with this ethereal, light and airy cake? I think so! And guess what? You’ll be the talk of the town. Share your cloud cake creations with us in the comments or on your social media, remember to tag me so I can see what you’ve made! What variations will you try first? What flavours are you dreaming of? Go ahead, make your baking dreams come true! You got this!
Craving a fresh, flavorful, and wholesome meal? This Cloud Cake is perfect for a quick lunch, light dinner, or even a party appetizer! Packed with large egg whites, it’s comfort food with a healthy twist. Whether you’re meal prepping or feeding a crowd, this dish is sure to please. Ready in 20 minutes and loaded with nutrients, it’s a must-try!